Tuesday, 26 March 2013

Workshop card

This is one of the cards we made recently at my Flowering Flourishes workshop, otherwise known as "The Big One" for more details of why it was called this read back the last couple of posts.

A bright white 6x6 inch white card blank, with a real red layer. A gorgeous die cut, pierced around the edge and stamped with a stamp from the Flowering Flourish stamp set using lucky limeade ink and a real red marker pen, this technique is quite easy. I inked my whole stamp using the green ink then with a baby wipe I rubbed off the flowers and using the marker coloured them red, I then stamped the whole design on to my die cut. Tiny brads to the centre of the flowers and a twist of ribbon to finish.


I'm really loving the pierced look at the moment and doesn't it look great around the die cut, adding real definition?


This technique is great to use up all those tiny pieces of ribbon that would probably head for the bin, a simple knot.


Is this your style of card?
Leave me a comment, let me know what you think.
Until next time, thank you for visiting and Happy Crafting, Dawn x

Monday, 25 March 2013

FF samples

Here is a very simple card using the gorgeous flowering flourishes stamp set.
This time I stamped with real red ink onto a gloss card blank and heat embossed with clear embossing ink to set it. A simple strip of ribbon and a knot along the lower edge. I stamped a heart in red and cut out, I stuck this with a foam pad for dimension. A greeting below the knot to finish.


Ooops! A close up, but I forgot to turn the photo the right way around, sorry.


Yes, close up photographs are not my thing, sorry its so blurry!


This was a very quick card and yet I think it looks quite classy, I have another design like this that I will show another day.
Is this too simple a design for you? Or do you like clean and simple cards? 
Leave me a comment below, so I don't feel like I'm alone.
Until next time, Happy Crafting, and thank you for visiting, Dawn x

Sunday, 24 March 2013

Flowering Flourishes workshop samples

Well I have been away for too long, I've been busy making samples for my Flowering Flourishes workshop, also known to my ladies as "The Big One" before you ask I will explain why it got this name, at most of my workshops my ladies make two cards, I provide everything needed and we share the stamp set(s) between us and I make a small charge for these, well I had an idea to coincide with Stampin' Up! saleabration promotion, where I choose a selection of products that we then use to make two cards and at the end you get to take the items away with you and craft to your hearts content, and your cards of course. Why does it matter about saleabration? Well for every £45 you spend during this time you get to chose a product from a choice, this year of 17 items, varying from ribbon and button bundles, papers, embossing folders, stamp sets, punches etc so for each of my ladies who signed up for "The Big One" they each chose their free gift. The items in the top photograph are what they paid for and the next few cards I show will be using these products and adding some bits from my stash to show the versatility of this stamp set, there was so much more I wanted to do with them but I just ran out of time, I know I will reach for this stamp set a lot!
So each person had.....
 Flowering Flourishes clear mount stamp set
Lucky Limeade ink pad
Real red marker pen
A pot of tiny silver brads
and a Boho flower punch, that escaped the photo
(And their choice of free product, from the leaflet)


Here is a very simple card I made using the stamp set with gilding flakes, it looks so much more lush in real life.

A close up of the gilding.


Simply stamped in real red, a couple of rhinestones, a twist of ribbon and finished, simple.


Do you like simple cards or something more complicated, this stamp set can do both?
What do you think?
Leave a comment below, until next time Happy Crafting, dawn x

Saturday, 2 March 2013

Flowering Flourishes


Here is a card I made with my Flowering Flourishes stamp set, have I said that I love this stamp set?


A close up of the topper.


A simple embossed background adds texture and interest.


The gorgeous flowers were made with the boho punch.


Ok, so what did I do?
I started with my favourite square card blank. I embossed a layer with an embossing folder and inked around the edge for definition, I used lucky limeade ink.
I die cut my shape and stamped the largest stamp from the set in lucky limeade ink. The ribbon is rich razzleberry, and so are the flowers. Rhinestones in the centre of the flowers and a few simple pearls to finish.


What do you think? Is this your kind of card? Leave a comment to let me know.
Until next time, happy crafting, Dawn x

Sunday, 24 February 2013

Flowering Flourishes stamp set

Introducing a fabulous stamp set from Stampin' Up! called Flowering Flourishes and I love it!!!
This set is available in wood mounted £21.95 or clear as here £17.95


I have chosen the clear option, which is red rubber mounted on foam for the best stamping but no wooden block, all this in a dvd style case for quick and easy storage. As you can see I don't stick the enclosed stickers onto my stamps and I find they stick to the acrylic block better without.


This set includes 3 stamps, one large, one medium and one smaller design.


I have a workshop coming up using this stamp set and have made a selection of samples to show the versatility, more of that to follow soon. If you are interested in joining us for this workshop contact me for details, dates are either Friday 8th March 7pm or Saturday 9th March 2pm, both dates are making the same items, a couple of places left only.

Until next time, Happy Crafting, Dawn x

Saturday, 23 February 2013

Betsy's Blossoms Tag

Today I have a quick post showing a tag I made recently.


Lots going on but quick and easy. I started with a die cut tag and stamped over the background with a variety of colours.


A quick rolled ribbon flower with a pearl in the centre.


I added a piece of ribbon, a small border and a leaf behind the flower near the bottom and the same matching ribbon through the hole at the top. I finished by using flakes around the edge for a little subtle bling!

I hope you like this quick make.
Until next time, Happy crafting, Dawn x

Thursday, 14 February 2013

Happy Valentines Day

Wishing everyone a very Happy Valentine's Day!
Here is a very simple card I made.


I started with a white gloss card blank, then layered half the card with real red and the other half with whisper white. I die cut the letters from both the white and red card, cutting them down the centre and sticking the white on top of the whole red letter. I punched a couple of sparkly silver hearts and added a faux stitched line around the outside and here it is...finished, a quick and simple card.
This second photo makes it look more like pink, in real life its definitely red!


Is this your kind of card or too simple and plain?
Leave a comment to let me know you came by.
Until next time, Happy Crafting, Dawn x

Wednesday, 13 February 2013

Summer silhouettes cheat!

Here are the photos I promised on my last post.
This is my summer silhouettes stamp set in the clear option.


Although as you can see by this photo they are not traditionally clear stamps, they are mounted red rubber but with no wooden block.
They come with matching stickers, which I chose not to use as I don't think they stick to the acrylic block properly if I use them, but that's me!


Here is my cheat to help line up this stamp, I have carefully cut three small "v"  shapes, one on each side and one in the centre. This does not damage the stamp at all.


Then after you stamp the first section you can use the "v" to help line up the next section, I found the top of the "v" points to the pattern from the line above, it took a couple of tries to get it how I wanted but was much easier than without the "v" shapes.


I hope this helps you line up your background stamp. Please leave a comment below to let me know what you think. Thank you for visiting, until next time, Happy crafting, Dawn x

Sunday, 10 February 2013

Summer silhouettes


Another busy and strange day, I'm having a few of them recently.
It started by setting up for my afternoon workshop.
Here are the piles of bits lined up on the table.


Here are the tables all set up.


Everyone gets the same...


This is the first card we made.
I used an A5 card blank in bravo burgundy, a strip of whisper white for the left hand side, stamped with the border stamp from summer silhouettes stamp set, inked in rich razzleberry ink, lined up by eye to make a continuous pattern (I will show you my trick for that when I take the photo of the stamp set, hopefully in the next couple of days)
A crumb cake layer and a whisper white mat for the stamping, this is the best card for stamping on in my opinion! I started by stamping the two size stalks in a random fashion with old olive ink, I then added the burst of flowers in rich razzleberry ink and the smaller flower in marina mist ink, trying to line them up with the stalks, this set is quite easy to do this with, you don't need a stamp positioner. I stamped one of the tiny filler stamps, from the same set, in crumb cake around the whole layer to fill the white space. Some crumb cake ribbon to add a bow, I died this ribbon as it was vanilla to start with, I used a crumb cake ink refil. A couple of drops of ink on your non stick mat, add a few spritz of water and run your ribbon through it well for an even coverage, dry with a heat gun and to get it flat and neat I used my hair straighteners to iron it, well I don't like ironing!
I stamped my greeting from tiny sentiments stamp set onto marina mist card and punched with the versatile modern label punch, I tucked this behind my top layer slightly.


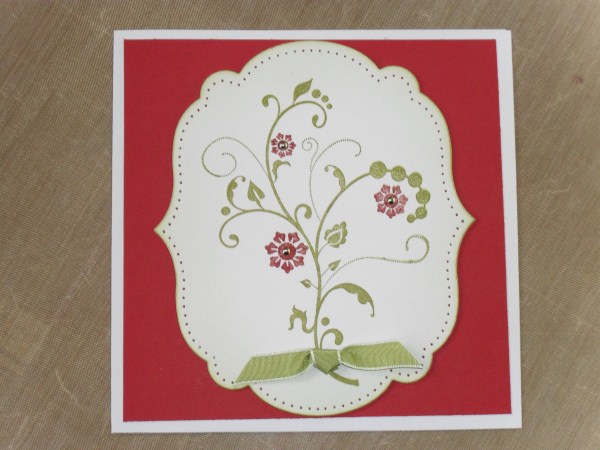
Our second card was also using summer silhouettes stamp set.
I started with a riding hood red A5 card base.
I cut a piece of crumb cake card for the mat, I stamped the leafy branch twice in old olive on to this layer. I stamped three flowers on to whisper white card using riding hood red ink and cut them out by hand, leaving a narrow white edge, I glued the flowers on after shaping them a little and finished them with a rhinestone in the centre.
I stamped using basic grey ink on to whisper white card and a stamp from my stash for the newsprint look near the bottom.
I stamped my greeting from tiny sentiments set with riding hood red ink again on to whisper white card and punched it out using my modern label punch.
For the border I cut baja breeze card with my adorning accent edgelit die, I used both the positive and negative parts, one above my panel and one below.


What do you think?
Is this your cup of tea?
Would you like to join us at our next workshop, making cards like these?
Leave me a comment below or contact me for more details of my next workshop dates.
Until next time, thank you for visiting and happy crafting, Dawn x

Saturday, 9 February 2013

Testing couple days

Firstly I'm sorry for not blogging for a while, I have lots to show you but other things have got in the way, this time it was a huge worry. One of my gorgeous dogs ate something he shouldn't of, he has done this before and the item follows the usual natural path and causes no real problem, not this time!
I didn't actually see him eat it, but my small dish cloth went missing, I guessed what had happened and all seemed ok at first, then Saturday morning I went to feed him and he didn't touch his food, this is unheard of for Nanook, so a visit to the vet swiftly followed. Where they suspected a blockage, an xray would help give more information so we had to leave him there, it was so painful walking away from my baby, followed by a wait for a phone call where I was told it was going to have to be surgery. A long and impatient wait on my part, I had another call explaining that it wasn't a straight forward procedure, they had to cut his stomach, bowel and intestine open to remove the object, that turned out not to be my small dishcloth at all. A major operation for him, poor thing. I had a very anxious night waiting for the next phone call, one where I didn't get any sleep. Our home was very empty without him and Kodi was behaving strangely, she obviously missed him too!
Nanook being himself I had the next call saying he was ready to come home as he was quite anxious being in the kennel, he had eaten well and was becoming quite vocal, it's funny, do you know chewbacca on star wars, they used an alaskan malamute for his voice and that is what Nanook sounds like, super cute! He has now had two check ups and everything is healing well so I can now breath properly. Will he learn from his traumatic outing?....no I guess not, but boy am I glad to have him back where he belongs, so is Kodi and the rest of the family. The picture above is of him in his full glory, taken before the incident, I couldn't post a photo of him with his shaved parts, its just not fair to see him like that.

Anyway back to craft, today is my workshop that had to be postponed from January due to the snow. I hope to bring you details of that soon, until next time Happy crafting, Dawn x