Showing posts with label lucky limeade ink. Show all posts

Sunday, 14 April 2013

Last FF sample

So finally my last sample from the flowering flourish workshop, I know there were a lot but, did you notice I managed to blog for at least two weeks every day!!!
So for my last sample I wanted something different, here is a simple tag.


You can see the 3D butterfly from this angle.
Thank you for visiting my blog,
I hope you have enjoyed seeing my flourish samples, I'm not sure what is coming next as I need to have a play but until then, Happy Crafting, Dawn x

Thursday, 11 April 2013

FF samples 17

Are you getting fed up with seeing my flowering flourishes samples (there were rather a lot!)?
These are similar to other samples I have shown so I wont leave full details, just photographs.


What do you think? Is this your style or not really? Leave me a comment below.
Happy Crafting, Dawn x

Saturday, 6 April 2013

FF samples 12

More samples from my flowering flourishes workshop.


This is a more subtle look still using my flowering flourishes stamp set.
I started with a square card blank. I punched a circle from some scrap card and used the waste part as a mask to ink through with a dauber, I did this three times along the bottom edge of my card.
I inked the smallest stamp from the set with lucky limeade and real red, I stamped this across two of my circles. I stamped my greeting inside the third circle.
I made a matching tag.


A close up of the tag.


What do you think?
Leave a comment below.
Until next time, thank you for visiting my blog today, Happy crafting, Dawn x

Friday, 5 April 2013

FF samples 11

Flowering flourishes stamp set.....so versatile.
I started with an A6 white card blank
I die cut my all time favourite top note shape in white and real red, I trimmed the white layer along the perforated lines so the red shows.
I stamped the middle sized flourish on to the die cut, tied some red bakers twine around the lower part of the die cut, added a small stamped greeting and finished.


A close up to see the details.


Thank you for visiting my blog today.
Until next time, Happy Crafting, Dawn x

Thursday, 4 April 2013

FF samples 10

Another card using the fabulous Flowering Flourishes stamp set.


A couple of my recent cards have used this layout so I wont bore you with the details.


The flowers have tiny brad centres.

Thank you for visiting my blog today. Come back to see more samples using this stamp set.
Until next time, Happy Crafting, dawn x

Wednesday, 3 April 2013

FF samples 9


Here is one of the cards we made at my recent Flowering Flourishes workshop, otherwise known 
as the big one!


I started with an A5 lucky limeade card blank, with my fold at the top.
I stamped a flourish along the bottom using lucky limeade ink.
I die cut three tags. I stamped the smallest flourish onto each of them with lucky limeade and real red ink.
On the centre tag I punched a flower using my boho punch and real red card, I added silver glitter glue to the centre of the flower.


I stamped my ribbon with the same flourish and ink.


A close up of the stamped ribbon (thank you Coll for the inspiration to stamp the ribbon, I love it!)


What do you think? 

Thank you for visiting my blog today.
Until next time, Happy Crafting, Dawn x

Tuesday, 2 April 2013

FF samples 8

Happy Anniversary


Here is a cute anniversary card I made using a flourish from my favourite stamp set (at the moment)
I started with a square card blank and stamped two flourishes near the lower part of the card. I stamped my greeting and doodled around the outside.
I drew and hand cut my bird design, on to spotty papers, inking around the edges and doodling to match the card base.
I tied a triple bow, this ribbon is gorgeous, its new from Stampin' Up! its called striped organdy ribbon, I couldn't decide which colour so I used all three!!! I added a couple of extra embellishments around the bow and its finished.
What do you think?


Here are a couple of close up photographs to show the details.


Do you love this ribbon?


My greeting


What do you think?
Is this your style of card?
Thank you for visiting my blog today.
Until next time, Happy Crafting, Dawn x

Monday, 1 April 2013

FF samples 7

Happy Easter Monday,
Happy April 1st!
No tricks today, though.


Lots of my recent samples were using lucky limeade and real red because that was what the ladies were getting in their kit, this card uses the same stamp set but with a different colour combo.
Another square card blank (my favourite) a strip of pink card down the centre, a die cut topper stamped with the medium size stamp from my Flowering Flourishes stamp set, a knot of the gorgeous new ribbon from Stampin' Up! and a punched mini butterfly.


I added a row of piercing around the outside of the die cut and using a fine tip marker I joined the dots to look like I had sewn it (no I don't do real sewing-not if I can help it) I also doodled around the outside of the card to bring my design together.


Did you prefer the green/red colour combo or is this more your thing?
Leave me a comment below.
Thank you for visiting my blog today, until next time Happy Craftting, Dawn x

Sunday, 31 March 2013

FF samples 6

Another similar card using the gorgeous Flowering Flourishes stamp set, come back tomorrow for a different colour palette.


A closer look. Those butterflies are sooo sparkly in real life.


Piercing around the die cut adds detail to the overall design and I like it!
What do you think?


Thank you for visiting my blog.
Until next time, Happy Crafting, Dawn x

Friday, 29 March 2013

FF samples 4

Wishing all my visitors today a very Happy Good Friday!


This is the second card we made at our last workshop, Flowering Flourishes, "The Big One" For me details read back the last few posts.
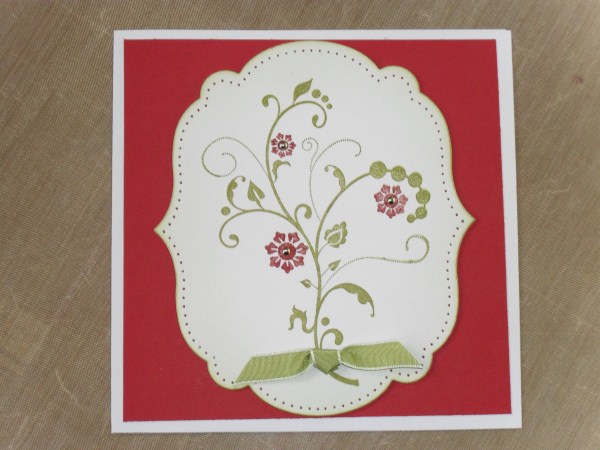
This is a large card, I started with an 8x8 inch card blank.
I cut three panels, one crumb cake, one lucky limeade and one real red (I think these colours work well together, what do you think?)
I die cut a topper and stamped the largest of the three designs from the Flowering Flourishes stamp set using lucky limeade ink, I also inked around the edges to soften the effect.
I punched the flowers from real red card using my boho punch, the centres were punched from the amazingly sparkly glitter card, I put a small piece of foam tape between each layer of the flower to add depth (If you want to keep your cards a little flatter for posting these flowers could easily be stuck together with glue)


A close up of the super sparkly flowers, what do you think?


Thank you for taking the time to visit my blog today, please leave a comment below so I know you have been. Until next time, Happy Crafting, Dawn x

Tuesday, 26 March 2013

Workshop card

This is one of the cards we made recently at my Flowering Flourishes workshop, otherwise known as "The Big One" for more details of why it was called this read back the last couple of posts.

A bright white 6x6 inch white card blank, with a real red layer. A gorgeous die cut, pierced around the edge and stamped with a stamp from the Flowering Flourish stamp set using lucky limeade ink and a real red marker pen, this technique is quite easy. I inked my whole stamp using the green ink then with a baby wipe I rubbed off the flowers and using the marker coloured them red, I then stamped the whole design on to my die cut. Tiny brads to the centre of the flowers and a twist of ribbon to finish.


I'm really loving the pierced look at the moment and doesn't it look great around the die cut, adding real definition?


This technique is great to use up all those tiny pieces of ribbon that would probably head for the bin, a simple knot.


Is this your style of card?
Leave me a comment, let me know what you think.
Until next time, thank you for visiting and Happy Crafting, Dawn x

Saturday, 2 March 2013

Flowering Flourishes


Here is a card I made with my Flowering Flourishes stamp set, have I said that I love this stamp set?


A close up of the topper.


A simple embossed background adds texture and interest.


The gorgeous flowers were made with the boho punch.


Ok, so what did I do?
I started with my favourite square card blank. I embossed a layer with an embossing folder and inked around the edge for definition, I used lucky limeade ink.
I die cut my shape and stamped the largest stamp from the set in lucky limeade ink. The ribbon is rich razzleberry, and so are the flowers. Rhinestones in the centre of the flowers and a few simple pearls to finish.


What do you think? Is this your kind of card? Leave a comment to let me know.
Until next time, happy crafting, Dawn x

Saturday, 10 November 2012

Perfectly preserved apples

When I saw the apple from the perfectly preserved stamp set, this was what popped into my head, so naturally I had to make it.
As you can see I opted for my preferred square card blank.
I added a square of designer series paper, a further whisper white card mat, which I pierced a pattern on to.
I then stamped eight green apples and one red apple, each time after inking in my chosen colour I added the seeds with an Early Espresso marker, all the apples were cut out using my matching cannery die set. The green apples were stuck on with my favourite tombo glue, whereas the red apple was stuck with foam pads.


A close up of the apples.


What do you think? Is this your kind of card?
Leave me a comment, below.

Until next time, Happy Crafting, Dawn x