Friday 28 December 2012

Thank you's

I have had a busy day making lots of Thank you cards, so I needed a quick and simple design or it would of taken me until next Christmas to make them, write them and give out.
Here is my quick card design.
These cards are 4x4 inch bases, I doodled around the edges and stamped my thank you greeting to the left. I punched two mittens using a punch and attached a small piece of white bakers twine to them, one end with double sided tape, the other with foam tape to add dimension. A sparkly rhinestone completes the look.


A close up of my not so good doodling, although I think I got the hang of it after these and another batch I made in a different colour.


When I lined them up to take a photo I must admit to being quite impressed with my efforts.


Until next time, Happy Crafting, Dawn x

Wednesday 26 December 2012

Evergreen

Like most people I have been so busy recently, I have made several projects and just haven't had the time to post them yet, so I guess you may see Christmas through out January, well I will try not to.
Here are two Christmas cards I made using my Evergreen stamp set, from the autumn/winter mini catalogue.

The first card uses cherry cobbler for my base card, a vanilla layer, a mat from the Festival of Prints paper stack, a vanilla die cut with the solid tree stamped on, then the tree words stamped on to vellum and die cut, I fixed this layer with the tiny silver brads and pierced around the edge.


A close up, you can see the tree design peeping from the layer underneath, and the writing from the word tree stamp is really clear, it lines up really easily too.


As you can see I made the same card design but changed the colours slightly, I like doing this to then decide which one I like the most. Again cherry cobbler base, very vanilla layer, a different paper from the same stack, a vanilla die cut (same shape, just turned slightly) I stamped the tree in blue this time, Marina Mist, I think, then the words in Early Espresso on the vellum layer, again fixed with tiny silver brads.


Which colour combo is your favourite?
Leave a comment below.

Thanks for stopping by, until next time Happy Crafting, Dawn x

Tuesday 25 December 2012

Merry Christmas


Merry Christmas and thank you for all my lovely gifts and cards this year.
I like to show case the cards that people make for me, as I feel they have put a lot of time and effort into this and deserve the recognition, so here they are in no particular order. Thank you everyone....

 Louise and family

 Hayley and family

 Helen and family

 Kel and family

 Louise A and family

 Val

 Lesley

 This card was made by a 6 year old, I wont name him as I haven't asked permission to do so.

 Janet and family

 Margaret

 Sandra

 Ali

 Colleen

Chris


Thank you all so much for taking your time to make me these lovely cards.
Until next time, Happy Crafting, Dawn x

Monday 24 December 2012

Oh, Christmas tree

The Christmas cd is blaring, we are "singing" along, what better time than to sort out the tree.
I was beginning to wonder if we were going to get a tree this year, as you can see we did, and here it is.
I went for a white and silver colour theme, it looks so much better in real life than in this photo, especially with the twinkling white lights.


Of course a tree is not fully decorated until the presents are placed under it, mmm I wonder what they are...?


I hope you have a wonderful time and are lucky enough to have special people around you to share these new memories. I'm blessed to have a table full for lunch tomorrow.

Until next time, Merry Christmas and Happy Crafting, Dawn x

Sunday 23 December 2012

Christmas Thank you's

Here are a few of the Christmas Thank you's I sent out this year.
A very simply decorated paper gift bag, cute huh?


Until next time, Happy Crafting, Dawn x

Sunday 16 December 2012

Indigo Blu visits


Here is a special friend of mine (on the left) with the lovely and very talented Kay from Indigo Blu, who we saw recently at the Taunton craft show, Sincerely Yours.


Whilst we were there Kay kindly let my friend Kelly have a hands on go with a stamp, flitter glu and flakes, Thank you Kay! 
I'm waiting for some reasonable weather, actually some sun so I can photograph a rather different project I have been working on, until then, Happy Crafting, Dawn x

Saturday 15 December 2012

Zoo Review Christmas

Here is a card I made using my Zoo review stamp set from Stampin' Up! not a typical Christmas stamp set but then they are the best sets as they are so versatile.
My usual square base card, scored with my diagonal plate, a layer of designer series paper on top of a strip of ribbon. I stamped the penguin and then cut with my cannery die set, a glitter topping adds a touch of frost.


A close up of the penguin in the jar with the glitter topping.


A close up of the scored background.


What do you think? Is this your cup of tea...or not?
Leave me a comment so I know you visited.
Until next time, Happy Crafting, Dawn x

Wednesday 12 December 2012

Scentsational Season

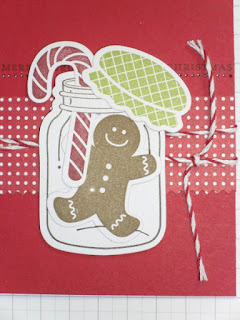
A quick and easy Christmas card made using Scentsational Season stamp set and 
matching Holiday Collection die set.


I started with an A6 real red card blank and added a strip of paper from the Summer Smooches paper pack. I stamped my sentiment from the Tiny Sentiments stamp set above the paper strip and tied some baker's twine over the paper.
I stamped the gingerbread man and candy cane from the Scentsational Season stamp set, I stamped the jar and lid using my Perfectly Preserved stamp set, I cut all the parts out using the matching dies. 
Stampin' Up! offer a 15% discount if you buy these stamp sets and dies as a bundle, they are available for a limited time, until the end of January, check out the mini catalogue by clicking on the icon above.
I then layered my cut outs as shown, simple!


Thank you for coming by, feel free to leave a comment below. 
Until next time Happy Crafting, Dawn x

Saturday 1 December 2012

Wheels to flat stamps

Have you ever bought wheel stamps and then not used them...?
Mmm, well I had, I tried to use them but they often went wonky even with the wheel ruler.
So, what could I do?


Firstly I found the join and gently cut with a sharp knife, a few times.


Gently peel back the rubber.


They peel really easily.


You can see in this photograph, the sticky glue, some on the wheel and some left on the rubber.
It peels off of both easily.


I chose to mount my stamp onto Stampin' Up! clear mount cling foam, here I am pulling back one of the layers that envelope it. One side of the cling is very sticky, this is the side that you fix the stamp to, the other side is not sticky to touch, this side clings to an acrylic block.


Position the stamp along the edge this leaves no wastage.


I have stuck two wheel stamps on here.


I then cut along the edge of the stamp, being careful not to cut in to the stamp.
It is important to use good quality sharp scissors for this, the very sticky foam will leave a residue on your scissors but this can be cleaned off easily when you have finished.


I cut between the two "wheel" stamps.


You can keep the stamp whole as I have with the top one (Nicely Knit)
Or cut carefully between the images to make multiple stamps like I have with the bottom one (Snowflake Party)


I store my flat wheel stamps in clear mount stamp cases, you can get one layer on each side and the case closes easily without squashing the stamps...perfect. Thank you, Stampin' Up!


Here are the cases, they come in a pack of four for £5.50
not just for flat wheel stamps, they can be used for storing any clear stamps, or foam mounted stamps, or anything else you can think of.


I hope this explains what I mean when I say flat wheel stamps and shows how easy it is to do.
Let me know how you get on with it, leave me a message below.
Until next time, Happy Crafting, dawn x